{{ post.title }}
글 편집
글 편집 (이전 에디터)
{{ post.author.name }}
작성일
| Version | {{ post.target_version }} | Product |
{{ product.name }}
|
|---|---|---|---|
| Tutorial/Manual | {{ post.manual_title }} | Attached File | {{ post.file.upload_filename }} |
배경
Sphere to Arc Revolution 접촉 요소는 볼 베어링을 효율적으로 시뮬레이션 하기 위해 개발되었습니다.
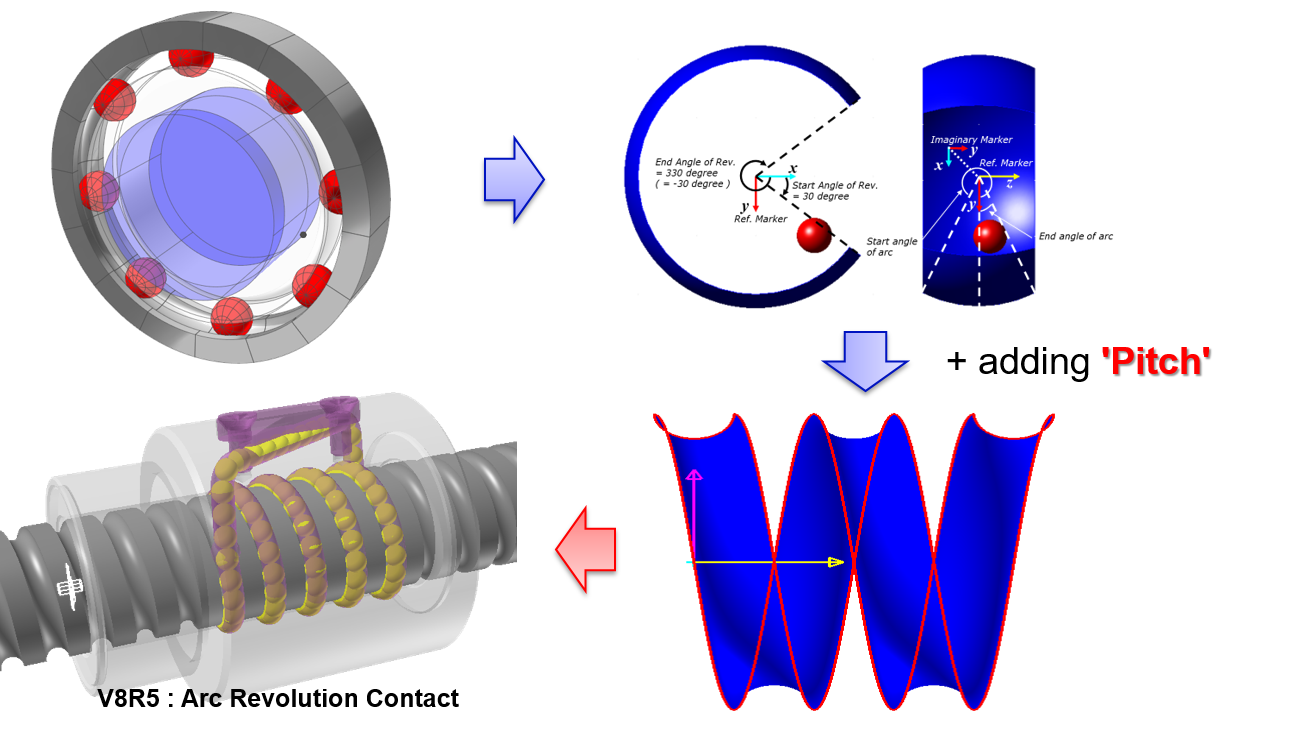
접촉면 생성
- 구면 (Sphere Surface)은 반지름과 중심점으로 표현됨.
- 이에 대응되는 면은 피치 정보를 포함한 회전 아크(Arc revolution)로 표현됨

생성 방법 1 - 'Circle, Point, Direction, Angle'
[Steps]
- ‘Ball_Screw_Using_ArcRevolution_w_Pitch_Contact_V8R5’ 파일을 엽니다.
- Body-Edit mode로 들어갑니다.
- Radius가 1이고, Angle이 180D인 Arc geometry를 생성합니다.
- 선택 옵션으로 “Circle, Point, Direction, Angle”를 선택하고 Arc Revolution 버튼을 클릭하여 이 기능을 실행합니다. (“Circle, Point, Direction, Angle”은 디폴트 옵션입니다.)
- Step 2에서 생성한 Arc geometry를 선택합니다.
- Revolution center point (0,0,0)을 선택하고, direction (0,1,0)을 정의합니다. 이것은 arc revolution의 Z축이 됩니다.
- Revolution의 angle에 360을 입력하면 그림과 같이 Arc Revolution geometry가 생성됩니다.
- Properties of ArcRevolution1 (Arc-Revolution surface geometry) 다이얼로그 박스를 엽니다.
- Helix Curve 옵션에 체크를 하고, Pitch의 입력칸에 ‘4’를 입력하고, Total Depth에 입력칸에'112’를 입력합니다.
- OK 버튼을 클릭합니다.

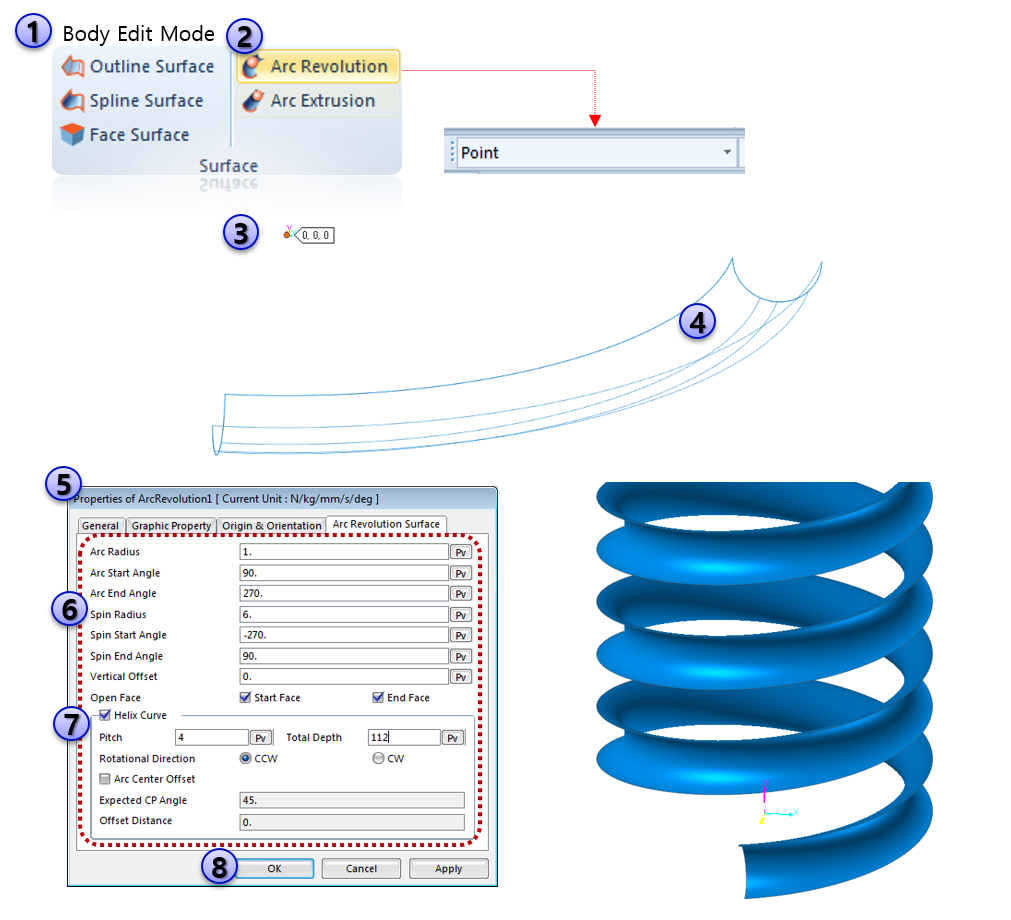
생성 방법 2 - 'Point'
[Steps]
- ‘Ball_Screw_Using_ArcRevolution_w_Pitch_Contact_V8R5’ 파일을 엽니다.
- Body-Edit mode로 들어갑니다.
- Arc Revolution 아이콘을 클릭하고, 생성 옵션을 ‘Point’로 변경합니다.
- Revolution center point의 위치를 <0,0,0>으로 정의합니다.
- 샘플값으로 생성된 arc-revolution surface가 생성됨을 확인할 수 있습니다.
- Properties of ArcRevolution1 (Arc-Revolution surface geometry) 다이얼로그 박스를 엽니다.
- 이 다이얼로그 박스의 Arc Revolution Surface탭 하단의 모든 데이터 값을 수정합니다.
- Helix Curve 옵션에 체크를 하고, Pitch의 입력칸에 ‘4’를 입력하고, Total Depth에 입력칸에'112’를 입력합니다.
- OK 버튼을 클릭합니다.
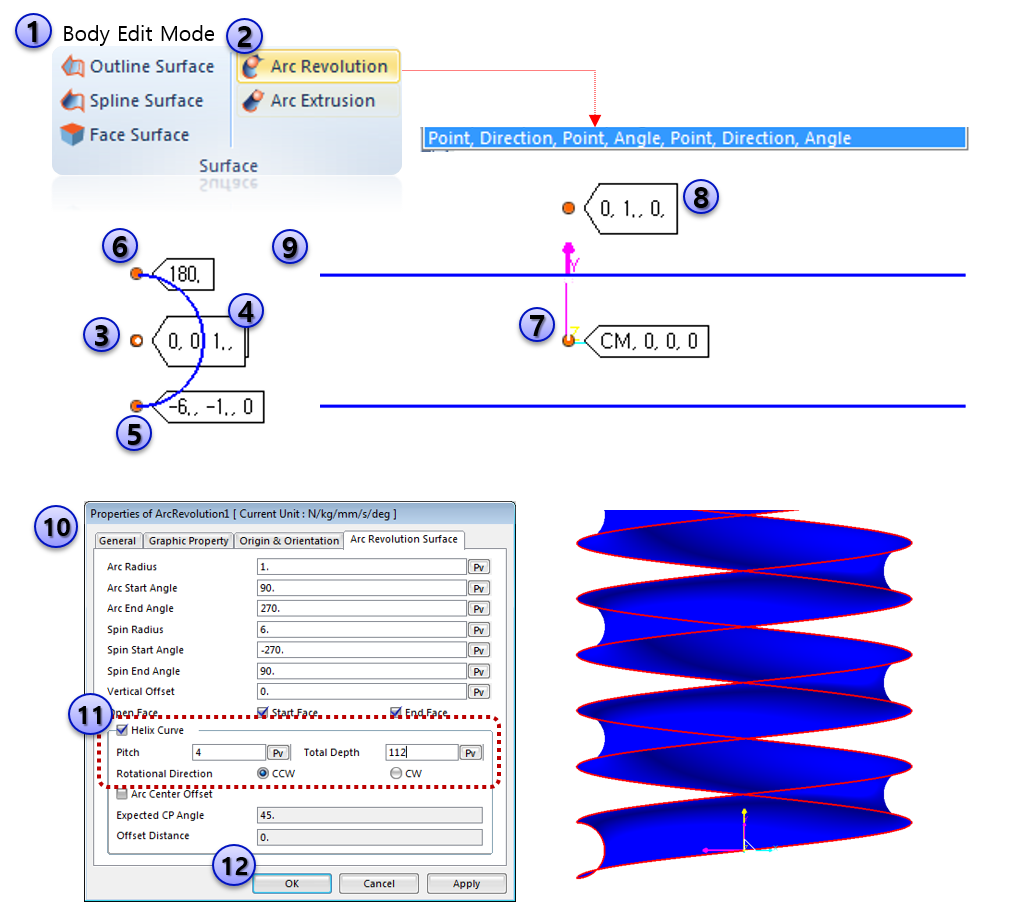
생성 방법 3 - 'Point, Direction, Point, Angle, Point, Direction, Angle'
[Steps]
- ‘Ball_Screw_Using_ArcRevolution_w_Pitch_Contact_V8R5’ 파일을 엽니다.
- Body-Edit mode로 들어갑니다.
- Arc Revolution 아이콘을 클릭하고, 생성 옵션을 ‘Point,Direction,Point,Angle,Point,Direction,Angle’로 변경합니다.
- Revolution center point의 위치를 <-6,0,0>으로 정의합니다.
- Arc Created plane의 Normal Direction의 위치를 <-6,0,0>으로 정의합니다.
- Arc geometry의 start point의 위치를 <-6,-1,0)으로 정의합니다.
- Arc의 Angle을 180도로 정의합니다.
- Revolution의 중심을 선택합니다.
- Revolution plane의 Normal Direction을 <0,1,0>로 정의합니다.
- Revolution의 Angle을 360으로 정의합니다.
- Properties of ArcRevolution1 (Arc-Revolution surface geometry) 다이얼로그 박스를 엽니다.
- Helix Curve 옵션에 체크를 하고, Pitch의 입력칸에 ‘4’를 입력하고, Total Depth에 입력칸에'112’를 입력합니다.
- OK 버튼을 클릭합니다.