This command creates an *.avi File (Filename.avi), which enables to store and to replay the animation results quickly. When creating the *.avi File, RecurDyn supports the following codec formats.
•Cinepak Codec by Radius
•Intel IYUV codec
•Microsoft Video 1
•Uncompressed.
The user must have a model in the initialized state and clicks Record icon to be active. If Record icon is not activated, click the Stop icon to initialize the model.
The user can embed the *.avi file in the presentation software such as PowerPoint, etc.
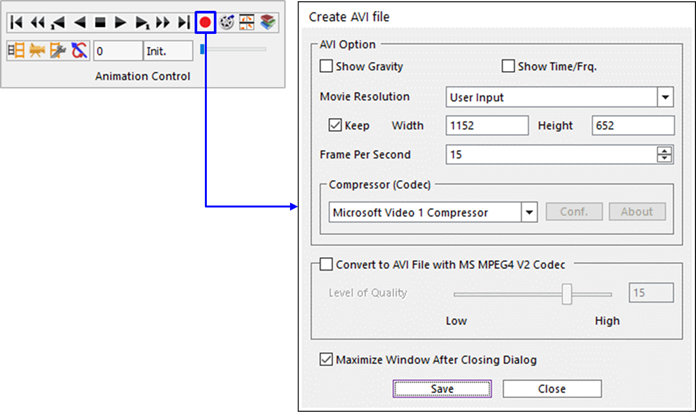
Figure 1 Create AVI file dialog box
•Show Gravity: If this option is checked, the gravity icon is displayed in the *.avi file.
•Show Time/Frq.: If this option is checked, the animation time or the frequency is displayed in the *.avi file.
•Movie Resolution: Selects the movie resolution among 320x240, 640x480, 800x600, 1024x768, 1152x864, 1280x960, 1280x1024, and 1920x1080. If User Input is selected, the user can enter the resolution.
•Keep: If this option is checked, the resolution aspect ratio is maintained.
•Width: If you select User Input option in Movie Resolution, this input box is activated. This value determines the horizontal resolution of the video.
•Height: If you select User Input option in Movie Resolution, this input box is activated. This value determines the vertical resolution of the video.
•Frame Per Second: Defines the number of frames per second.
•Compressor (Codec): Defines the codec of AVI file.
•Conf. (Configuration Codec): If the selected codec provides Configuration dialog, this button is activated. Press the activated button to open the Configuration dialog box for the selected codec.
•About (Codec): If the selected codec provides About dialog, this button is activated. Press the activated button to open the About dialog box for the selected codec.
•Convert to AVI File with MS MPEG4 V2 Codec: If this option is checked, the movie file is encoded by MS MPEG4 V2 Codec again for the recorded file. So, finally the user-defined codec and MS MPEG4 V2 codec are used together for the movie file. If you have a more efficient codec, you should not use this option.
•Level of Quality: This uses fixed quality-based Variable-Bit-Rate encoding.
•The main advantage of quality-based VBR encoding is that quality is consistent within a file and from one file to the next.
•Level of Quality enables you to specify a level of quality for a video stream instead of a bit rate. The codec will then encode the content so that all samples are of comparable quality.
•You can select a video quality level with slider (or type on textbox), where value is a number from 1-20, with 20 being highest quality/largest file size and 1 being the lowest quality/smallest file size.
•The video quality can be affected if the file size is further lowered by lowering the "Level of Quality" value under 15.
•Maximize Window After Closing Dialog: If this option is checked, the Working Window is maximized after closing the Create AVI File dialog box.
•Save: Saves the information of the animation to an *.avi file on the desired disk drive.
Step to save an AVI File
1. After finishing a simulation, click the Record icon of the Animation Control group in the Analysis tab.
2. If desired, adjust the number of Frames Per Second.
3. Select Movie Resolution. The more the value of the resolution is large, the more the file size is large.
4. Select Compressor(codec).
5. Click Save.
6. After recording, click Close in Create AVI file dialog box.
Note
When Recording, the file size of more than about 4GB (4200000000 Bytes) is not supported. Recording ends when that capacity is exceeded.