The user can fill holes of one geometric entity by the following procedure.
•Solid(Sheet), WithDialog
•Solid(Sheet): Selects a solid or sheet geometry. And then the Fill Hole Operation dialog box appears.
•WithDialog: Selects several edges or faces. The selected holes are filled by clicking OK in the Fill Holes dialog box.

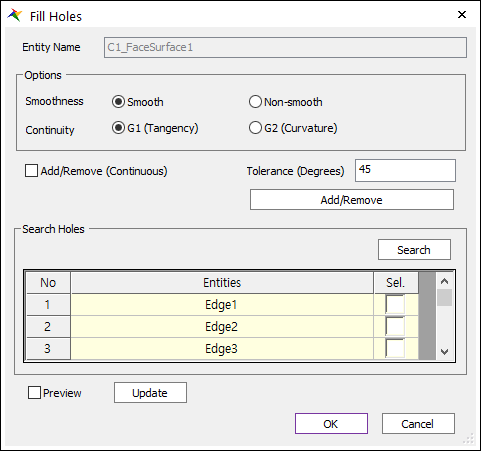
Figure 1 Fill Hole dialog box
o Entity Name: Shows the name of the selected entity.
o Smoothness: Selects the surface to fill the holes whether the created surface connected to the faces smoothly.
o Continuity: Selects whether the surface to fill the holes is G1 or G2 smooth at the boundary edges.

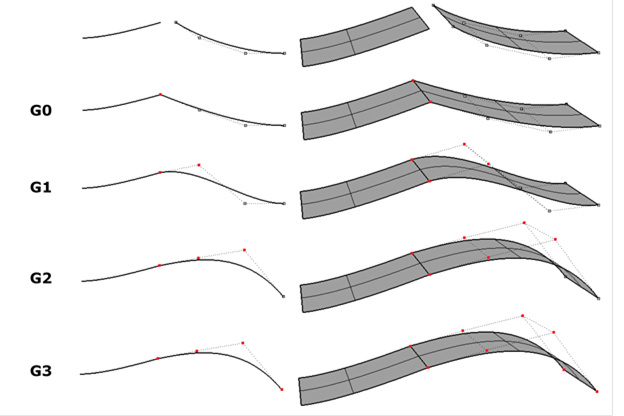
Figure 2 Smoothness and Continuity of Fill Holes
o Non-Smooth G0: The surface has continuous position. Faces are connected and have no gap.
o Smooth G1: The surface has continuous normal and same tangent at the connected part.
o Smooth G2: The surface has continuous curvature.

Figure 3 Continuity of a curve and a surface
o Add/Remove: If the selected geometry is a surface, the edges around the hole should be selected. If the selected geometry is a solid, the faces should be selected. The selected faces are deleted, and the hole is filled with the new faces.
o Add/Remove (Continuous): When using Add/Remove, if this option is checked, the connected faces within the degrees are selected together.
o Tolerance (Degrees): The angle of between the connected two faces.
o Search Holes: Searches all the edges around the holes. The edges are selected by checking the checkbox in the grid. (This function is available only with the surface geometries.)
o Preview: Previews that the holes are filled on Working Window.
o Update: Updates the preview.